我想要说
今天学习了 EditTable 组件,也就是文本框。
这次,通过文本框和前面的按钮进行组合。就可以做一个简单的登录界面了。
所以本次写的就是登录界面以及获取用户名和密码
登录注册实例
界面代码部分
界面使用的是 RelativeLayout 布局,但是这里使用 LinearLayout 布局其实会更加的方便。因为这样可以避免设置“谁的下方是谁”这种浪费时间的属性,在实际运用中,能用简单的布局就用简单的布局为好。
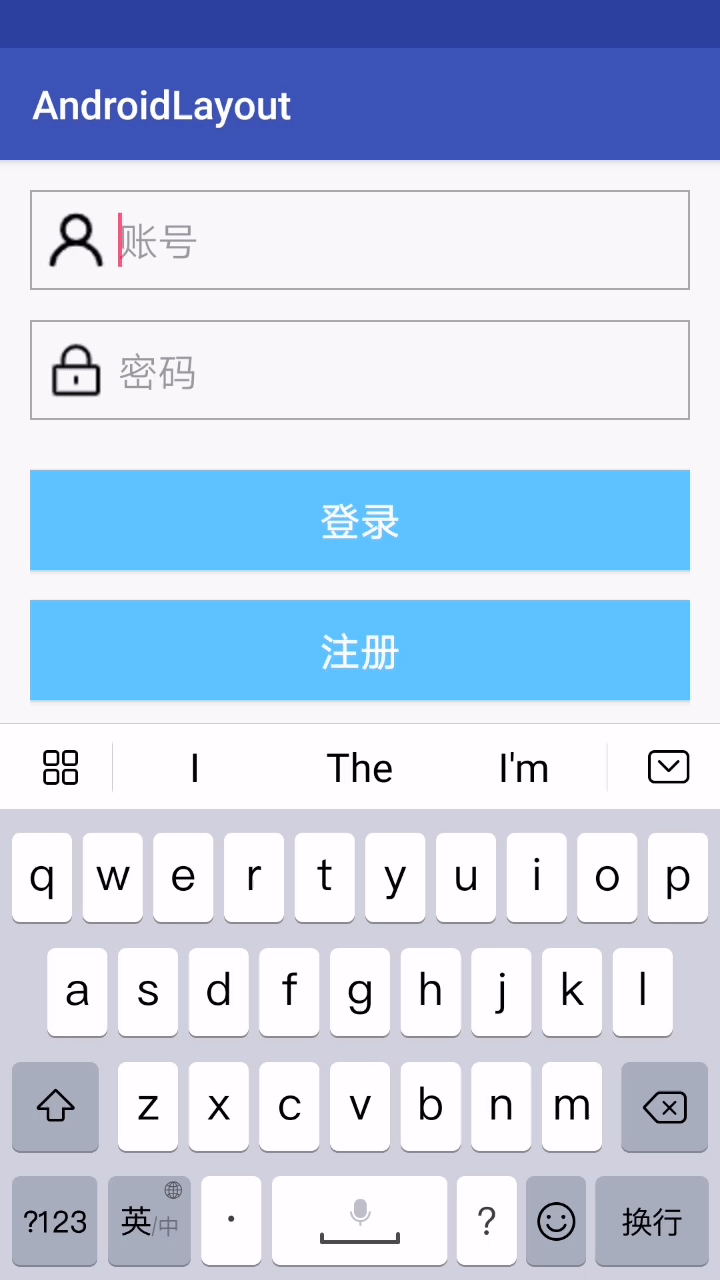
相对布局中共有 4 个控件,一个是账号文本框,一个是密码的文本框。还有两个按钮,一个登录按钮和一个注册的按钮。
其中账号和密码分别设置和 Hint 属性,Hint 与 HTML 中的 placeholder 是一样的,分别都是给用户的一些提示。除了这些,还使用到了 drawableLeft 属性,设置了用户图标的锁的图标,分别在用户输入框和密码输入框中
<?xml version="1.0" encoding="utf-8"?>
<RelativeLayout xmlns:android="http://schemas.android.com/apk/res/android"
    xmlns:tools="http://schemas.android.com/tools"
    android:layout_width="match_parent"
    android:layout_height="match_parent"
    android:padding="15dp"
    tools:context="top.bestguo.androidlayout.EditTextActivity">

    <!-- 设置第一个文本框,类型为用户名 -->
    <EditText
        android:id="@+id/user"
        android:layout_width="match_parent"
        android:layout_height="50dp"
        android:hint="账号"
        android:textSize="20sp"
        android:background="@drawable/input_text"
        android:drawableStart="@drawable/user"
        android:drawablePadding="5dp"
        android:padding="7dp"
        android:maxLines="1"/>

    <!-- 设置一个文本框,类型为密码 -->
    <EditText
        android:id="@+id/password"
        android:layout_width="match_parent"
        android:layout_height="50dp"
        android:textSize="20sp"
        android:layout_below="@id/user"
        android:layout_marginTop="15dp"
        android:inputType="textPassword"
        android:background="@drawable/input_text"
        android:hint="密码"
        android:drawablePadding="5dp"
        android:padding="7dp"
        android:drawableStart="@drawable/lock"
        android:maxLines="1"/>

    <!-- 设置一个登录按钮 -->
    <Button
        android:id="@+id/login"
        android:layout_width="match_parent"
        android:layout_height="50dp"
        android:layout_below="@id/password"
        android:layout_marginTop="25dp"
        android:text="登录"
        android:textSize="20dp"
        android:textColor="#fff"
        android:background="#6cf"/>

    <!-- 设置一个注册按钮 -->
    <Button
        android:layout_width="match_parent"
        android:layout_height="50dp"
        android:layout_below="@id/login"
        android:layout_marginTop="15dp"
        android:text="注册"
        android:textSize="20dp"
        android:textColor="#fff"
        android:background="#6cf"/>

</RelativeLayout>
效果如下
java 代码部分
java 代码部分主要是通过 addTextChangeListener 这个监听器来监听这两个文本域中发生的变化,将获取到的用户名和密码保存到定义的成员变量中,然后通过登录按钮的点击事件来获取用户名和密码,最后使用 Toast 来展示用户输入的用户名和密码。
注意:在实际的开发是,不能够这样直接将用户名和密码直接展示出来,这很做非常危险。因为这只是一个简单的示例,目的是如何获取用户名和密码的
package top.bestguo.androidlayout;

import android.support.v7.app.AppCompatActivity;
import android.os.Bundle;
import android.text.Editable;
import android.text.TextWatcher;
import android.view.View;
import android.widget.Button;
import android.widget.EditText;
import android.widget.Toast;

public class EditTextActivity extends AppCompatActivity {

    // 定义了一个按钮
    private Button loginBtn;
    // 定义了两个文本框,一个用户输入框,一个密码输入框
    private EditText userEdit, passwordEdit;
    // 设置用户名和密码,将获取到的用户名和密码保存到成员变量中
    private String user, password;

    @Override
    protected void onCreate(Bundle savedInstanceState) {
        super.onCreate(savedInstanceState);
        setContentView(R.layout.activity_edit_text);
        // 得到用户名和密码的文本框
        userEdit = (EditText) findViewById(R.id.user);
        passwordEdit = (EditText) findViewById(R.id.password);
        // 创建一个监听器,用来监听文本框的内容改变。
        // 同时,将改变的内容,保存到定义好的成员变量中。
        // 在这里面可以编写用户名的判断,是否符合规则等等。
        userEdit.addTextChangedListener(new TextWatcher() {
            @Override
            public void beforeTextChanged(CharSequence charSequence, int i, int i1, int i2) {

            }

            @Override
            public void onTextChanged(CharSequence charSequence, int i, int i1, int i2) {
                user = charSequence.toString();
            }

            @Override
            public void afterTextChanged(Editable editable) {

            }
        });

        // 效果和上面一样的
        passwordEdit.addTextChangedListener(new TextWatcher() {
            @Override
            public void beforeTextChanged(CharSequence charSequence, int i, int i1, int i2) {

            }

            @Override
            public void onTextChanged(CharSequence charSequence, int i, int i1, int i2) {
                password = charSequence.toString();
            }

            @Override
            public void afterTextChanged(Editable editable) {

            }
        });

        // 得到登录按钮
        loginBtn = (Button) findViewById(R.id.login);
        // 通过点击事件获取用户名和密码
        loginBtn.setOnClickListener(new View.OnClickListener() {
            @Override
            public void onClick(View view) {
                // 将用户名和密码通过提示框来展示
                Toast.makeText(EditTextActivity.this, "用户名为:" + user + ",密码为:" + password, Toast.LENGTH_LONG).show();
            }
        });
    }
}
效果如下

至于为什么在输入密码的时候会黑屏,这肯定是华为的安全机制。录屏过程中,不能让别人知道密码是多少。这一点,华为很赞!
请勿发布违反中国大陆地区法律的言论,请勿人身攻击、谩骂、侮辱和煽动式的语言。