我想要说
Android 中有两个常用的布局 “LinearLayout” 和 “RelativeLayout” 两种。今天学习了 RelativeLayout 布局,所以记录一下学习此布局的一些体会吧。
RelativeLayout 布局也叫相对布局,它根据参考父容器或者相对于其它的容器所在的位置所决定的。
等我学会了用 git,未来将会代码上传到 github 上 😭😭😭
布局属性的介绍与使用
RelativeLayout 的相关属性
当然,前面提到的 LinearLayout 中的公共属性也能够应用到该布局中
| 属性名 | 属性描述 |
|---|---|
| layout_toStartOf | 在哪个元素的左边,需要指定“哪个元素”的id |
| layout_toEndOf | 在哪个元素的右边,需要指定“哪个元素”的id |
| layout_toLeftOf | 同 toStartOf,不推荐使用,需要指定“哪个元素”的id |
| layout_toRightOf | 同 toEndOf,不推荐使用,需要指定“哪个元素”的id |
| layout_alignParentBottom | 在父空间的底部,值为 true 或者 false |
| layout_alignParentEnd | 在父空间的右边,值为 true 或者 false |
| layout_alignParentRight | 同 alignParentEnd,不推荐使用,值为 true 或者 false |
| layout_alignParentStart | 在父空间的左边,值为 true 或者 false |
| layout_alignParentLeft | 同 alignParentStart,不推荐使用,值为 true 或者 false |
| layout_below | 在哪个元素的底部,需要指定“哪个元素”的id |
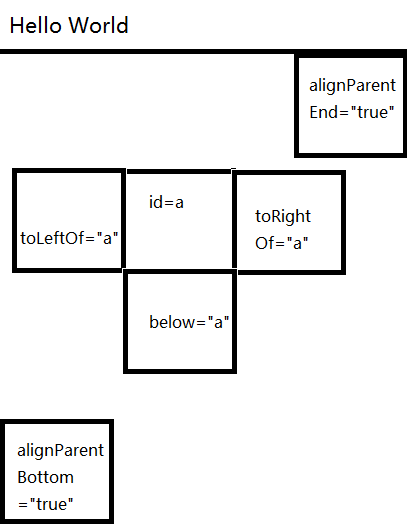
谁的哪边
以下图示展示了这些属性所带来的效果。
假设整个界面就是父容器。
为了能够更好的展示出这些属性的效果,id 为 a 元素的位置是随意画的。😄😄
RelativeLayout 代码示例
示例 1
<RelativeLayout xmlns:android="http://schemas.android.com/apk/res/android"
    xmlns:tools="http://schemas.android.com/tools"
    android:layout_width="match_parent"
    android:layout_height="match_parent"
    tools:context="top.bestguo.androidlayout.RelativeActivity">

    <!-- 设置父空间的底部对齐和右部对齐 -->
    <View
        android:id="@+id/view_1"
        android:layout_width="100dp"
        android:layout_height="100dp"
        android:background="#000000"
        android:layout_alignParentBottom="true"
        android:layout_alignParentEnd="true"/>

    <!-- 设置父空间的底部对齐和右部对齐 -->
    <View
        android:id="@+id/view_2"
        android:layout_width="100dp"
        android:layout_height="100dp"
        android:background="#000000"/>

    <!-- 设置位置view_2的右边 -->
    <View
        android:id="@+id/view_3"
        android:layout_width="100dp"
        android:layout_height="100dp"
        android:background="#ff0033"
        android:layout_toEndOf="@id/view_2" />

    <!-- 设置在 view_2 的底部 -->
    <View
        android:id="@+id/view_4"
        android:layout_width="100dp"
        android:layout_height="100dp"
        android:background="#cc4273"
        android:layout_below="@id/view_2"/>

</RelativeLayout>
效果如下:
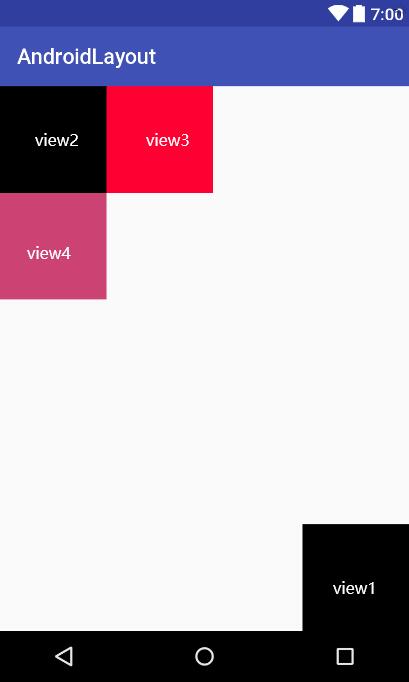
其中,在 view_3 中属性 layout_toEndOf,意思是在谁的末尾。这里设置的是 view_2 的末尾。
还有,在 view_4 中属性 layout_below,意思是在谁的底部。这里设置的是 view_2 的底部。
示例 2
以下示例展示了布局的嵌套
<?xml version="1.0" encoding="utf-8"?>
<RelativeLayout xmlns:android="http://schemas.android.com/apk/res/android"
    xmlns:tools="http://schemas.android.com/tools"
    android:layout_width="match_parent"
    android:layout_height="match_parent"
    tools:context="top.bestguo.androidlayout.RelativeActivity">

    <!-- 设置父空间的底部对齐和右部对齐 -->
    <View
        android:id="@+id/view_1"
        android:layout_width="100dp"
        android:layout_height="100dp"
        android:background="#000000"
        android:layout_alignParentBottom="true"
        android:layout_alignParentEnd="true"/>

    <!-- 设置父空间的底部对齐和右部对齐 -->
    <View
        android:id="@+id/view_2"
        android:layout_width="100dp"
        android:layout_height="100dp"
        android:background="#000000"/>

    <!-- 设置位置view_2的右边 -->
    <View
        android:id="@+id/view_3"
        android:layout_width="100dp"
        android:layout_height="100dp"
        android:background="#ff0033"
        android:layout_toEndOf="@id/view_2" />

    <!-- 设置在 view_2 的底部 -->
    <View
        android:id="@+id/view_4"
        android:layout_width="100dp"
        android:layout_height="100dp"
        android:background="#cc4273"
        android:layout_below="@id/view_2"/>

    <!--
        除此之外,还能设置线性布局的位置。
        此线性布局是设置在view_4的下面。
        因为布局之间本来就是可以套用的。
    -->
    <LinearLayout
        android:layout_width="match_parent"
        android:layout_height="185dp"
        android:layout_below="@id/view_4"
        android:background="#0066ff"
        android:padding="10dp">

        <View
            android:layout_width="100dp"
            android:layout_height="match_parent"
            android:background="#ff0033" />

        <!--
            设置了一个相对布局的组件。里面放了两个元素
        -->
        <RelativeLayout
            android:layout_width="match_parent"
            android:layout_height="match_parent"
            android:padding="10dp">

            <!-- 设置id为view_5 和颜色 -->
            <View
                android:id="@+id/view_5"
                android:layout_width="100dp"
                android:layout_height="match_parent"
                android:background="#ee9c4e"/>

            <!-- 设置了属性,在view_5的右边并且设置左外边距为10dp -->
            <View
                android:layout_width="100dp"
                android:layout_height="match_parent"
                android:background="#ee9c4e"
                android:layout_toRightOf="@id/view_5"
                android:layout_marginLeft="10dp"/>

        </RelativeLayout>

    </LinearLayout>

</RelativeLayout>
效果如下:
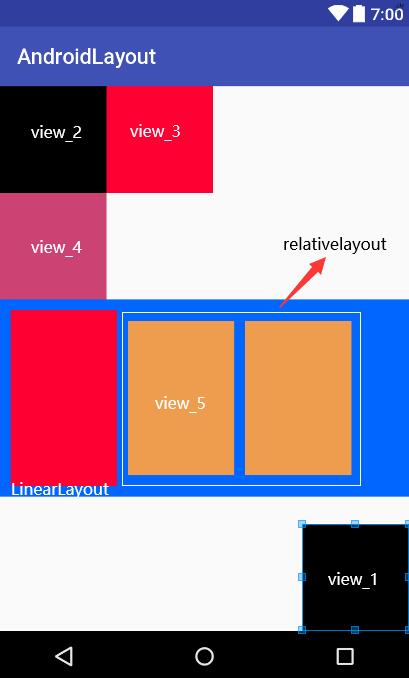
示例 2 使用到了前面学习的线性布局。即 LinearLayout 布局,然后线性布局当中又用运用到了相对布局。可见,布局之间是可以进行嵌套的。我也是刚刚学,我想未来在做界面的时候肯定是要用到各种布局的嵌套吧。
示例 2 在示例 1 的基础上进行扩充。这些布局系统也可以设置 layout_below 等这些相对的属性,包括未来使用的那些组件也是一样的,他们也能使用这些属性。但前提是这些属性要对应在哪个布局下面,否则,这些属性也将会是无效的属性。
其中 LinearLayout(背景颜色为蓝色部分) 设置了 layout_below 属性,设置的 id 为 view_4,也就意味着这个 LinearLayout 布局是在 id 为 view_4 的组件的下面。然后 LinearLayout 布局系统内默认是水平排列的。设置了一个 View 组件和一个 RelativeLayout 组件。
其中 RelativeLayout(用白色框框起来的)有两个 View 组件,第一个 View 的组件的 id 为 view_5。第二个 View 组件中设置了一个属性为 toRightOf ,值为 view_5,也就是在 view_5 的右边。有间隙是因为第二个 View 组件中设置了一个外边距 marginLeft(建议使用 marginStart) 值为 10dp。
什么?布局居然在套娃,禁止套娃,禁止套娃!✋✋✋
请勿发布违反中国大陆地区法律的言论,请勿人身攻击、谩骂、侮辱和煽动式的语言。